
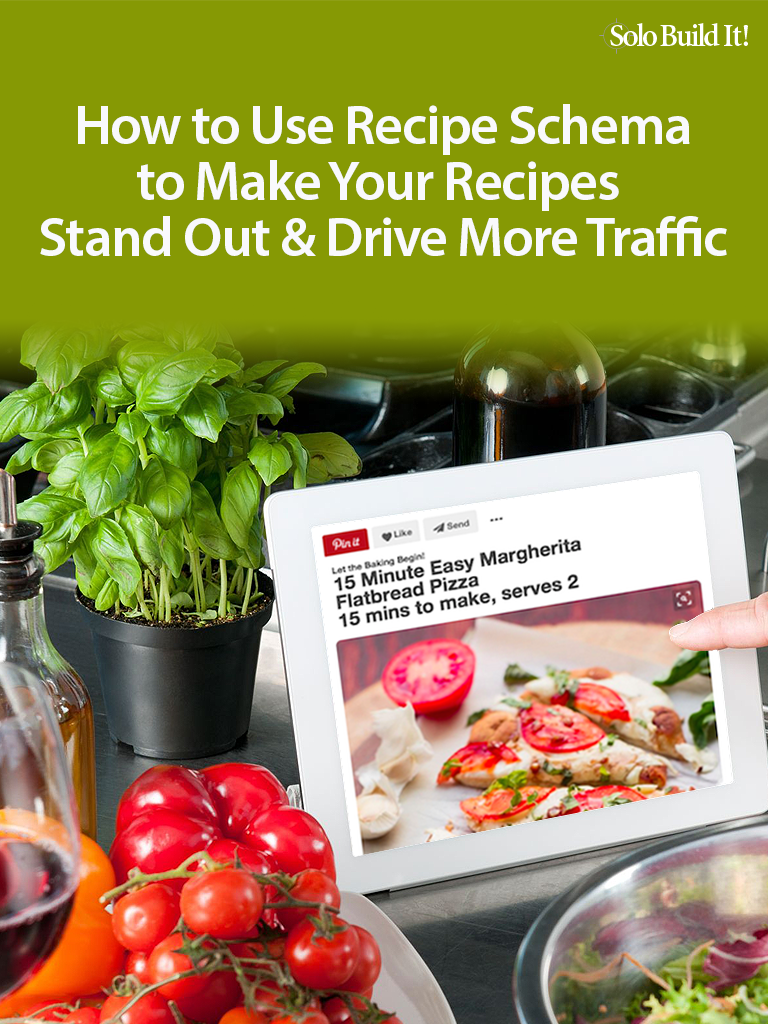
Have you ever used Pinterest or Google to search for a recipe, and noticed how some people’s recipe details are displayed in the results without you having to click through to the full article?
These savvy chefs and food bloggers have discovered a clever trick that helps Google and Pinterest better understand their recipes. As a result, people searching for that oh-so-delicious ice cream sundae are able to see things like Ingredients and Time To Prepare at a glance.
This trick is Recipe Schema (don’t worry, we’ll get into what that means, exactly, in a moment).
Here’s an example from Pinterest:

And here’s an example from Google:
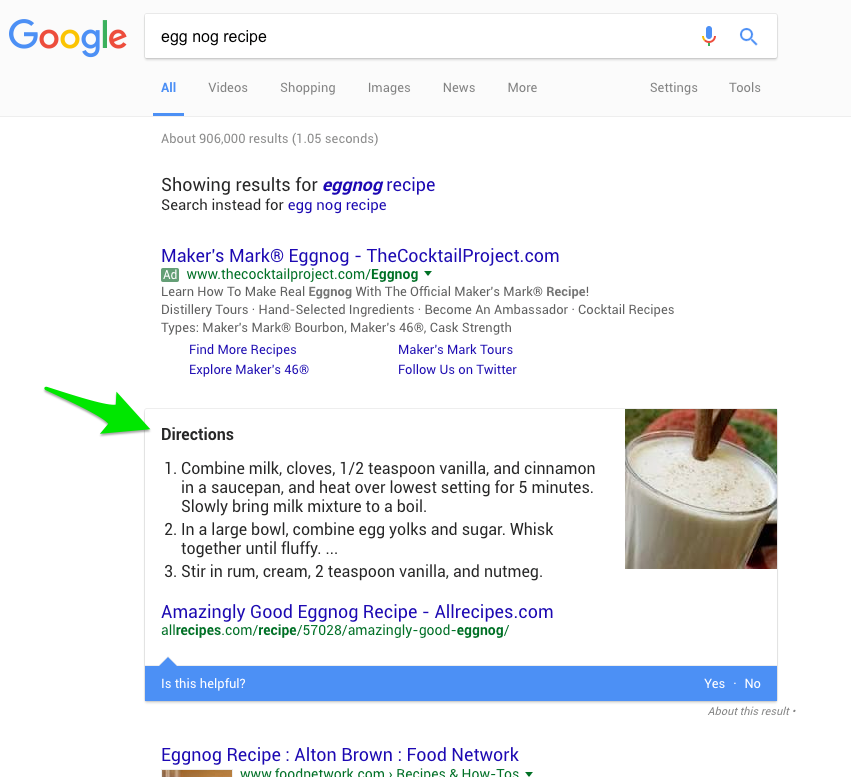
The above Google SERP shows the #1 ranking. But you’ll also notice, lower down, that some results have a little more pizazz than others…
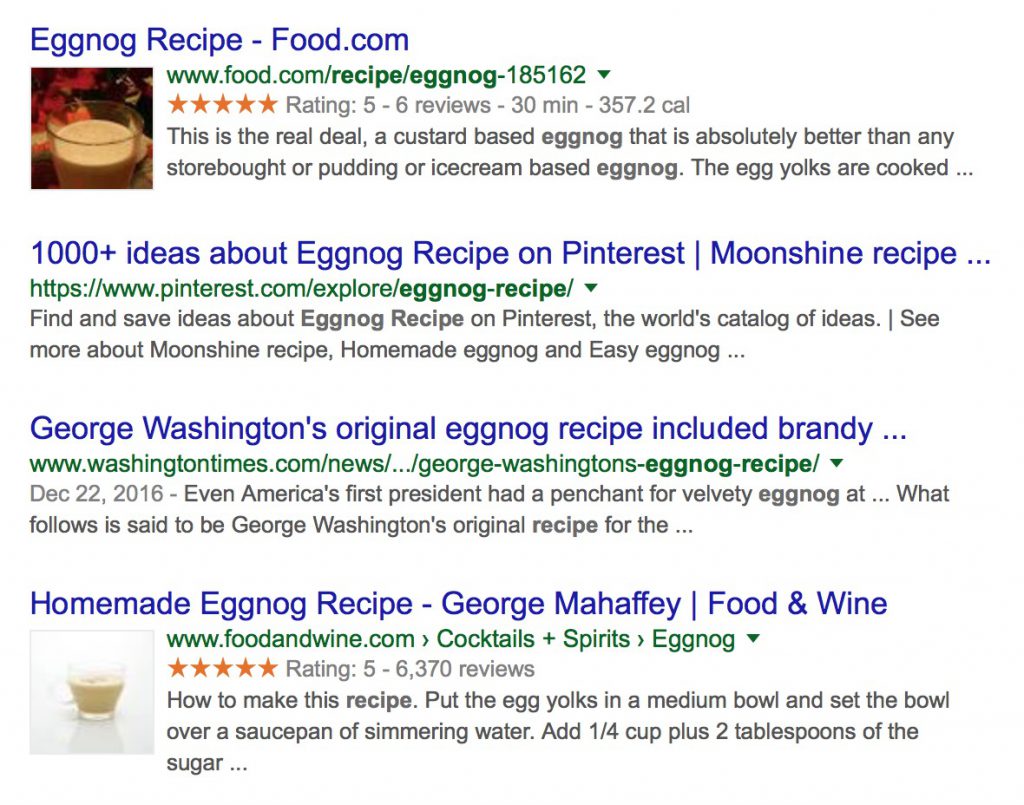
Notice how 2 of the 4 listings have more POP to them? This article shows YOU how to pop at Pinterest and Google.
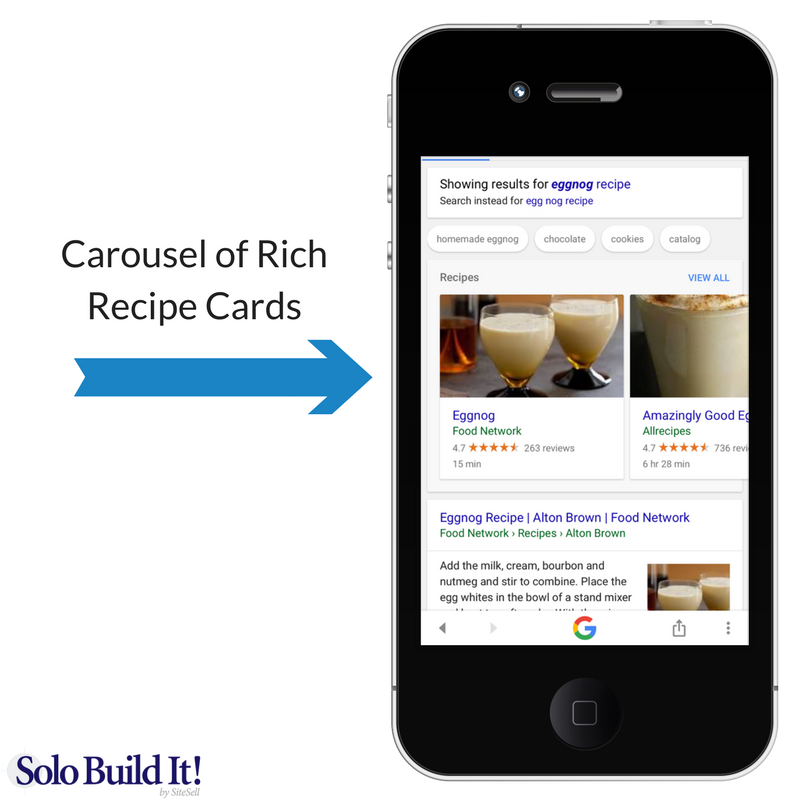
Mobile Google Search users will also see recipe results appear as a carousel of “recipe cards” above the regular results.
If you’re creating this kind of content, implement this technique to improve how your content shows up in Google and Pinterest. We’ll walk you through it step-by-step, how you can easily set this up, including a template you can use.
But before we do, you’re probably asking yourself if it’s worth the effort.
Time is a resource we all value, particularly as solopreneurs, so it’s certainly worth having that discussion.
Why Implement Recipe Schema?
Here’s the first question everyone asks: “If adding recipe schema will add additional recipe information to my pins or search results, does that mean people won’t have to click through to the recipe page?”
Using this technique DOES enable Google to abuse sites in their SERPs, but there’s no sign of them doing so.
Alisa Meredith of AlisaMeredith.com says it well…
“Here’s the thing — you can see the ingredients on the rich pin, so you know if you have all that stuff in the house or if you’re likely to find it in the store, meaning you’re going to get more clickthroughs (as long as you don’t have weird ingredients). But, you don’t see the instructions on rich pins, so you still have to go to the site if you want to make it.”
Kate Ahl of SimplePinMedia.com points out a definite advantage…
“One of the biggest reasons for this is their ability to update Pin information (or “metadata”) in real time.”
That means changes to your content will automatically be reflected in any pins that have already been pinned to people’s Pinterest boards.
And Amy Locurto of LivingLocurto.com mentions that, thanks to the additional information being displayed, searchers may see key points of interest that would have otherwise been obscured, like “gluten free.”
Finally, Cris Goode of RecipesThatCrock.com reminds us that Pinterest users think differently than users of other platforms. Instead of browsing, it’s more likely that pinners are intentionally searching for items that can be pinned and saved for later. Recipes are very well suited to this.
She says, “Search is an important part of the Pinterest user experience. Rich Pins help categorize my recipes so that they show up properly in search, and readers find them when searching for specific meal ideas.”
Any action we can take that improves the user experience and increases the likelihood of people finding our content in search is a worthwhile task.
Conversely, it’s only the instructions that are included in Google Search results snippets, requiring that the searcher click through to get the full list of ingredients and other details.
Either way, even though you’re providing the full set of schema data points, you won’t be giving away your complete recipe without ever gaining the benefit of a site visitor.
While the implementation of this markup will not have a direct impact on the ranking of your recipes in search, the benefit may be felt indirectly. If more people click on your recipe as a result of the improved listing and click through rate.
But you don’t have to take my word for it. Let’s hear what Google expert Matt Cutts has to say on the subject:
Given the value of using Recipe Schema, and the fact that both Google and Pinterest have built up a trusted “norm of use” that would be hard to change, it’s time to take a bite out of this deliciously prepared recipe.
What Exactly Is Recipe Schema?
Schema is a vocabulary that has been implemented across the web to provide a more universally understood structure identification. Like meta tags, schema is used by search engines to do more than just index your content — they can use schema to understand and categorize content within a page.
Think of schema like this…
If you have a doctor’s appointment, they might tell you go to Building D, Room 201 at Mercy Hospital. While you could get by if all you had was the street address of the hospital, knowing the room and building information makes it easier for you to navigate your way through a maze of parking lots, buildings, wings and floors to get to where you need to go.
Like a building directory with names, floors and room numbers, schema organizes your content into a logical and recognizable structure.
Unlike meta tags, however, schema is implemented within your body content in order to tag specific snippets of text, so it’s a bit more complex than what you may be used to.
While there are schema arrangements for a variety of different kinds of content, it’s books, movies and recipes that have seen the broadest implementation.
How to Implement Recipe Schema
Implementing recipe schema involves adding some additional HTML to each of the important pieces of text. This is referred to as microdata. We’re going to go through each of the types of microdata and explain how they’re used.
Itemscope — This indicates that what follows is going to include rich data.
Itemtype — This indicates the type of data: in this case, a recipe.
Together, these two elements look like this when added to your page:
If this all looks like gobbledygook to you, don’t worry, we’ll get into specific examples and implementation in a moment (along a with a template you can use!).
Itemprop — This indicates a specific property of the recipe. Possible elements include:
- name — The name of the recipe. This title may be truncated, depending on length. All formatting and HTML tags will be removed. (Required)
- recipeIngredient — A single ingredient used in the recipe, e.g., sugar, flour or garlic. (Required)
- url — The canonical URL for the page. (Optional)
- image — The URL for a high-resolution image of the recipe. You can add up to 6 images. (Optional)
- totalTime — The total time it takes to prepare and cook the recipe in ISO 8601 duration format. (Optional)
- recipeYield — The quantity or servings made by this recipe (e.g., “5 servings,” “Serves 4-6” or “Yields 10 burgers”). (Optional)
Pinterest and Google support the above elements. Google also supports:
- cookTime — The time it takes to cook the dish, in ISO 8601 duration format.
- cookingMethod — The method of cooking, such as Frying, Steaming, …
- nutrition — Nutrition information about the recipe.
- prepTime — The length of time it takes to prepare the recipe, in ISO 8601 duration format.
- recipeCategory — The category of the recipe — for example, appetizer, entree, etc.
- recipeCuisine — The cuisine of the recipe (for example, French or Ethiopian).
- recipeInstructions — A step or instruction involved in making the recipe.
- suitableForDiet — Indicates a dietary restriction or guideline for which this recipe is suitable, e.g., diabetic, halal, etc.
For example, Yield might be set up like this:
Duration Specifications
For the duration elements prepTime, cookTime and totalTime, use ISO format.
What does that mean? Most recipes will need to simply indicate Hours or Minutes, which is done by using H and/or M with the value, such as 1H30M to mean one hour and thirty minutes. It’s preceded by P for Period and T for time, for a final markup of PT1H30M.
Example:
Nutrition Information
If you have it, you can add appropriate nutrition information to your recipe using the following elements:
- calories — The number of calories.
- carbohydrateContent — The number of grams of carbohydrates.
- cholesterolContent — The number of milligrams of cholesterol.
- fatContent — The number of grams of fat.
- fiberContent — The number of grams of fiber.
- proteinContent — The number of grams of protein.
- saturatedFatContent — The number of grams of saturated fat.
- servingSize — The serving size, in terms of the number, by volume or weight.
- sodiumContent — The number of milligrams of sodium.
- sugarContent — The number of grams of sugar.
- transFatContent — The number of grams of trans fat.
- unsaturatedFatContent — The number of grams of unsaturated fat.
For example:
<div itemprop=”nutrition” itemscope itemtype=”http://schema.org/NutritionInformation”>
Nutrition facts:
<span itemprop=”calories”>240 calories</span>,
<span itemprop=”fatContent”>9 grams fat</span>
</div>
Putting It All Together
Now that all of the details have been laid out, let’s go through an example and work our way through a normal implementation.
Suppose you have the following recipe published on your site:
Aunt Kathy’s World Famous Banana Bread
By Mike Allton, Feb 8, 2017
<img src=”bananabread.jpg” alt=”Banana bread on a plate” />
This classic banana bread recipe comes from my aunt — the walnuts add a nice texture and flavor to the banana bread.
Prep Time: 15 minutes
Cook time: 1 hour
Yield: 1 loaf
Tags: Low fat
Nutrition facts:
240 calories, 9 grams fat
Ingredients:
– 3 or 4 ripe bananas, smashed
– 1 egg
– 3/4 cup of sugar
…
Instructions:
Preheat the oven to 350 degrees. Mix the ingredients together in a bowl. Add the flour last. Pour the mixture into a loaf pan and bake for one hour.
You would add the HTML so that the converted recipe looks like this:
<span itemprop=”name”>Aunt Kathy’s World Famous Banana Bread</span>
By <span itemprop=”author”>Mike Allton</span>,
<meta itemprop=”datePublished” content=”2017-02-08″>Feb 8, 2017
<img itemprop=”image” src=”bananabread.jpg” alt=”Banana bread on a plate” />
<span itemprop=”description”>This classic banana bread recipe comes from my
aunt — the walnuts add a nice texture and flavor to the banana bread.</span>
Prep Time: <meta itemprop=”prepTime” content=”PT15M”>15 minutes
Cook time: <meta itemprop=”cookTime” content=”PT1H”>1 hour
Yield: <span itemprop=”recipeYield”>1 loaf</span>
Tags: <link itemprop=”suitableForDiet” href=”http://schema.org/LowFatDiet” />Low fat
<div itemprop=”nutrition” itemscope itemtype=”http://schema.org/NutritionInformation”>
Nutrition Facts
<span itemprop=”calories”>240 calories</span>,
<span itemprop=”fatContent”>9 grams fat</span>
</div>
Ingredients
<span itemprop=”ingredients”>3 or 4 ripe bananas, smashed</span>
<span itemprop=”ingredients”>1 egg</span>
<span itemprop=”ingredients”>3/4 cup of sugar</span>
…
Instructions
<span itemprop=”recipeInstructions”>
Preheat the oven to 350 degrees.
Mix the ingredients together in a bowl.
Add the flour last.
Pour the mixture into a loaf pan.
Bake for one hour.
</span>
</div>
First, we inserted a new <div> at the beginning of the content that indicated what follows is a Recipe and that it’s using schema to outline the details. (Don’t forget to close the recipe content with a closing </div> tag!)
Next, there are “standard” schema elements for Name, Author, datePublished, Image and Description.
We then turned Prep Time, Cook Time, Yield, Tags, Nutrition Facts, Ingredients and Instructions into the appropriate itemprop microdata.
Note that each nutrition fact and ingredient requires its own itemprop span. And of course, every span requires a closing </span> tag.
Meta Tags
One last step to set up your site to use rich pins is to apply the following meta tags:
og:site_name — This is the name of your website, and should be included in the header of all your pages.
og:type — This refers to the type of content you’re displaying, in this case, it’s considered an “article.”
For the other pages and articles on your site that aren’t recipes, add additional meta tags so that they, too, can benefit from Pinterest Rich Pins.
Once you’ve set up all of your meta tags and at least one recipe, run that URL through the Pinterest Rich Pin Validator. This will confirm that you’ve set everything up correctly, as well as let Pinterest know that your recipes are ready to be displayed that way when pinned.
Recipe Schema Template
Below is a blank template that you can copy and paste then fill in the details for whatever recipe you’re adding to your site.
Solo Build It! members can use a reusable block to quickly position the requisite markup without having to install additional plugins or modules just for this purpose.
<span itemprop=”name”>Recipe Name</span>
By <span itemprop=”author”>Your Name</span>,
<meta itemprop=”datePublished” content=”YYYY-MM-DD”>Mon, dd, yyyy
<img itemprop=”image” src=”imagefile.jpg” alt=”Image Description” />
<span itemprop=”description”>Recipe Description</span>
Prep Time: <meta itemprop=”prepTime” content=”PT??”>? minutes
Cook time: <meta itemprop=”cookTime” content=”PT??”>? hour
Yield: <span itemprop=”recipeYield”>Your text</span>
Tags: <link itemprop=”suitableForDiet” href=”http://schema.org/LowFatDiet” />Your tags text
<div itemprop=”nutrition”
itemscope itemtype=”http://schema.org/NutritionInformation”>
Nutrition facts:
<span itemprop=”calories”>Your text</span>,
<span itemprop=”fatContent”>Your text</span>
</div>
Ingredients:
– <span itemprop=”ingredients”>Your text</span>
– <span itemprop=”ingredients”>Your text</span>
– <span itemprop=”ingredients”>Your text</span>
…
Instructions:
<span itemprop=”recipeInstructions”>
Your text
</span>
</div>
We recommend making a copy of this template in your favorite text editor and adjusting it to fit your routine needs. If you never list nutrition facts, and usually have 6–10 ingredients, make those modifications to your new template.
While there are no specific best practices when it comes to implementation of certain aspects of recipe schema, it’s a good idea to make sure that all of your recipes include a complete list of ingredients, instructions, yield and prep time, as well as great images, so that your recipe will look good in both search and once clicked through.
Wrapping Up
With recipe schema set up for your recipes, you will give potential readers at Google and Pinterest more valuable information to attract and entice them into the great content on your site. With Google, that will result in higher click-through rates and better ranking. With Pinterest, the result will be more pins and repins (and more traffic!).
If you already have a lot of recipe content within your site, consider starting with your most popular pins and recipes. (Go to https://analytics.pinterest.com to quickly identify your best pins, and Google Analytics to see most trafficked recipes from Google Search.)
Make a note in a spreadsheet or a Google Analytics annotation when you update each of your recipes so that you can track the performance improvement.
Have questions? Leave a comment here, or share what’s going on in the Solo Build It! social media forums.
Latest posts by Mike Allton (see all)
- How to Avoid Failure in an Entrepreneurial Business - September 23, 2019
- How to Use Buffer for Social Media Management: The Solopreneur’s Guide - September 15, 2019
- Wix Review: An In-Depth Comparison of 10,000 Websites - September 1, 2019
