
These days, businesses who fail to leverage the power of social media, particularly solopreneurs who are pushing with all their might to find momentum for their startup, are missing a golden opportunity.
If you’re not sure how to promote your website, or get products in front of people, social media is a great place to start. But it’s hard to keep up with consistently.
It’s far too easy to think that you’ll have time to create a presence on social media later, or that you can just focus on Facebook and ignore the other platforms.
That’s “leaving money on the table” as the saying goes, since you never know what opportunities might exist for you on LinkedIn or Twitter until you try.
That’s why it’s critical for solopreneurs that they find and use a tool and system for managing that social media presence.
A great social media management tool can make some of the necessary, more routine, tasks of social media activity easier and less time consuming.
One of the most popular free social media scheduling tools is Buffer. (Though they also offer a paid tier for businesses that need more features and accounts.)
Like any tool, Buffer will take a little time to learn in order to adapt it to your business needs — whether it’s an online business, like affiliate marketing or blogging, or brick and mortar — but it’s worth it.
Fortunately, we’re going to cover everything you need to know in order to use Buffer to manage your entire social media presence, and it will only take about twenty minutes to get through it all.
Ready to learn how to use Buffer?
Ok. Take a deep breath, and let’s review what we’re going to cover today:
- What Is Buffer?
- What Social Networks Does Buffer Support?
- How Much Does Buffer Cost?
- How to Get Started
- When’s the Best Time to Post?
- How to Monitor Social Media Engagement
- How to Find Other Content to Share
- How to Use Buffer’s Analytics
- Social Media Scheduling: Daily / Weekly / Monthly
Here we go…
What Is Buffer?
Clearly, Buffer is a social media management tool or we wouldn’t be talking about it in this context, but what does that mean, really?
- Any social media management tool worth its salt has to be able to post status updates to social networks. What’s more, it should support multiple social networks.
- A good social media management tool should support scheduling of updates to whatever networks that tool supports, and which allow scheduling.
- Ideally, the social media management tool will provide insight into the effectiveness of your social media activity.
A Quick History of Buffer
In 2010, that’s what Joel and Leo, the co-founders of Buffer, set out to do. They started with Twitter, and offered a tool that was designed to allow users to share tweets and schedule them in advance.
Over time, they added support for multiple networks, analytics to review performance (including a great weekly email delivered to your inbox), and have continued to enhance their already outstanding scheduling ability.
With Buffer, social media posting on a consistent basis is a lot easier – which is a key success factor in business.
Throughout the rest of this article, we’ll dig into how to use Buffer. This will include all of the specific features and functions Buffer offers, and demonstrate why they’re special.
What Social Networks Does Buffer Support?
While Buffer may have started with Twitter, it’s quickly grown to support all of the major networks, as well as many of the different kinds of profiles for different networks.
- Twitter: Buffer supports Twitter and multiple Twitter accounts. Since Twitter makes no distinction between personal or business profiles, if you want a separate Twitter handle for your business, you simply create a second account.
- Facebook: You can connect Facebook Pages and Groups.
- LinkedIn: Buffer supports personal LinkedIn profiles as well as LinkedIn company pages.
- Pinterest (only on paid plans): You can connect your Pinterest account and schedule pins to any of your boards. While this includes shared boards in addition to your normal boards, secret boards are not yet supported.
- Instagram: The new favorite of many business owners, Instagram (personal and business profiles) is now available to Buffer users.
For more information, read our article on Pinterest vs Instagram for Business.
So with a Buffer account, you can schedule posts to any or all of those social networks, including both personal and business profiles for the platforms that allow it.
But what is all of that connectivity going to cost you?
How Much Does Buffer Cost?
There are three plans, Pro, Premium, and Business – in addition to the free option.
The free plan is really just an unlimited trial in which you can check out Buffer for as long as you need, but it’s limited in overall capacity. You can only connect up to three social accounts (excluding Pinterest) and schedule 10 status updates per account. The free plan does not provide any analytics or the option to re-share content using the “Share Again” feature.
Pro Plan $15/month
The Pro Plan is what most solopreneurs and businesses need. With it, and for just $15/month, you can:
- Connect up to 8 social profiles
- Schedule up to 100 status updates at any given time
- Use 1 team member
- Limited analytics
Premium Plan $65/month
- Connect up to 8 social profiles
- Schedule up to 2,000 status updates
- Use 2 team members
- Full analytics
Business Plan Starting at $99/month
- 25 social profiles
- 5 / 10 / 25 team members
- 2,000 scheduled status updates
- Use 6 team members
- Full analytics
For a detailed overview of all plans, check out Buffer’s comprehensive feature list.
How to Start Using Buffer
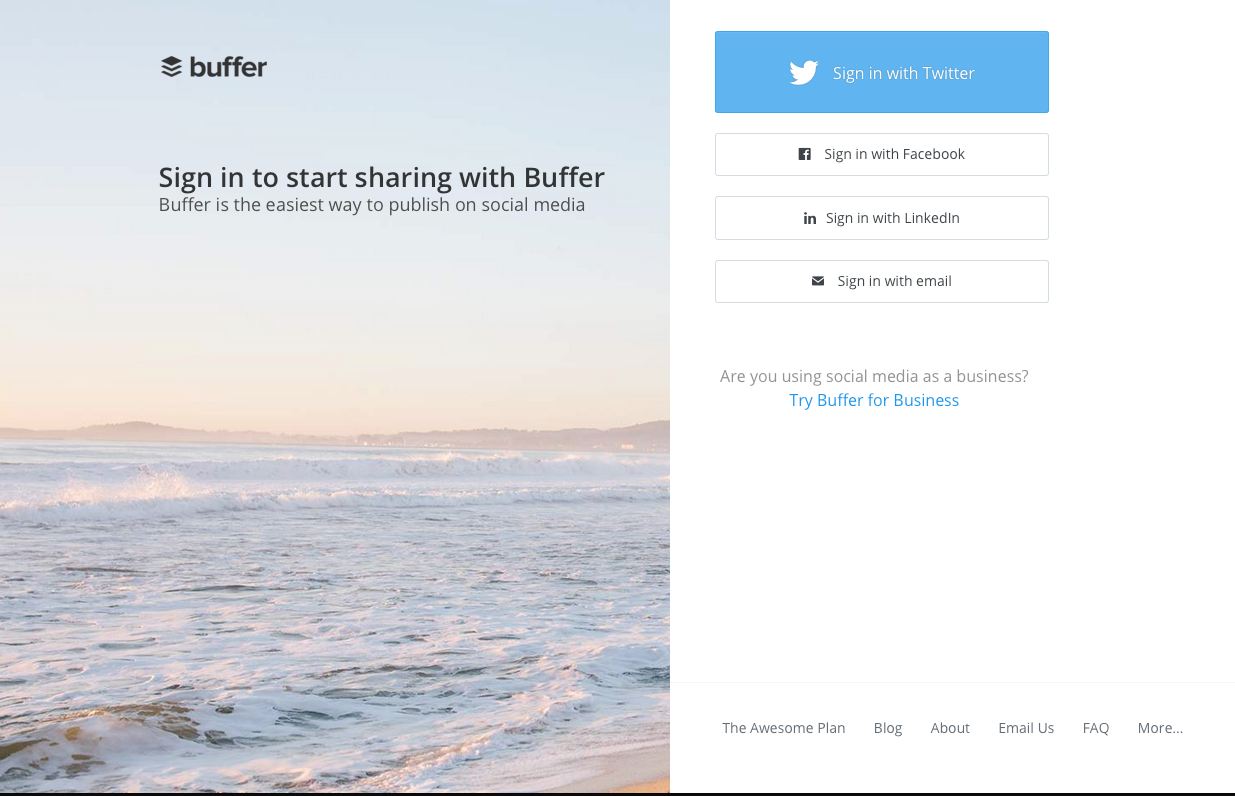
If you haven’t already, head over to Buffer and create your account.
Buffer supports “single sign on” which means you can use one of your existing social network profiles to get started, and I certainly recommend that. It makes logging into Buffer ten times faster and easier.
So use whichever network you’re typically logged into. (Just remember which one you used, and make sure all of your social profiles use strong, secure passwords.)
Give Buffer an email address, and then head over to My Account to review your other account settings. Here, you can turn off or on various email reminders (getting reminded when Buffer has shared all of your updates is essential), as well as set up a secret email address if you want to be able to email a status update to Buffer.
Click on Dashboard in the left menu at any time to return to the main Buffer app.
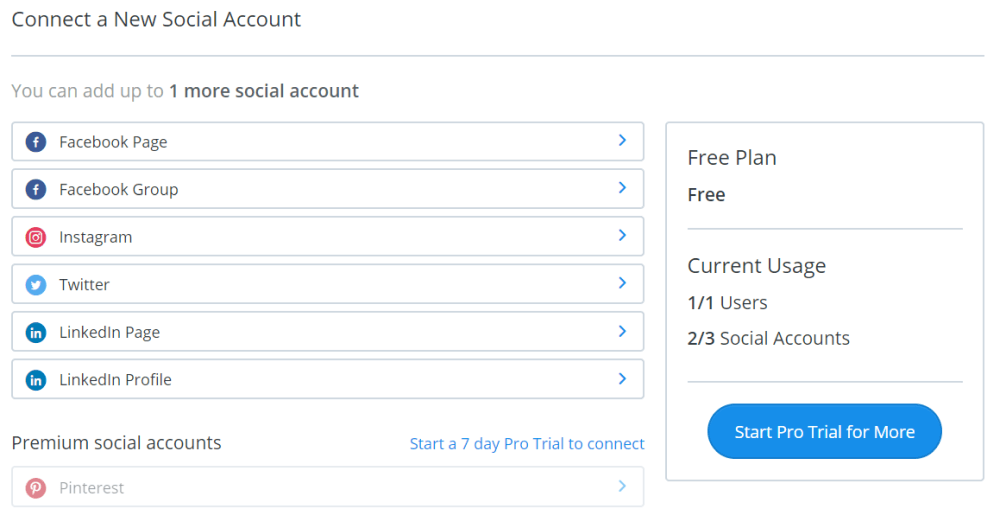
Connect Social Profiles
The next step in learning how to use Buffer is within the dashboard, along the left side, you’ll see all of the social networks you’ve connected. If you’re just starting, the only connected network will be the one you used to log in, so it’s time to connect the rest!
Below the list of connected profiles within the Buffer dashboard you’ll find a tab to “Connect More.” Click that and you’ll find the Connect a Social Network screen.
Here you can select any of the available social networks and one by one, add all of your most important social media profiles.
As you add more social profiles, you’ll see them appear in the left menu. Clicking on any of those social profiles will give you access to that profile’s settings, schedule and queue.
To the left of each social profile is a circle that you can check. This is to indicate to Buffer which social networks you would like to be selected by default.
Whatever you choose, you can change it for any given status update, and can update your defaults on the fly if, for instance, you’re going through a project of finding evergreen content of your own that you know you’ll want to share to all your profiles.
Navigating Profile Tabs
If you click on any of your connected social profiles, you’ll be able to access all of the options and settings for that profile, as well as any status updates that you have scheduled.
There are three tabs along the top: Queue, Analytics and Settings.
With the Content tab selected you will reveal four sub-tabs:
- Queue: Your queue is where all of your scheduled posts appear for this particular social profile. If you have not yet scheduled any status updates, your queue will be empty.
- Analytics: With the free plan, you will only see the posts you have shared and when. With paid plans, you’ll get access to more stats (see below).
- Settings: Here’s where you can set up your posting schedule, reconnect to an account, shuffly your queue and enable Google Analytics campaign tracking.
This is the heart of your Buffer dashboard. Each of your social profiles can have an entirely different queue, as well as different suggestions, contributions and feeds.
This allows solopreneurs the flexibility of having social profiles that truly cater to their unique audience, rather than just blasting the same messages across all profiles at once.
Analytics
With the Analytics tab selected, you will reveal three sub-tabs: Posts, Analysis, Insights.
We’ll spend time in a moment reviewing all of the analytics you’re able to get from Buffer, but for now, what’s important to note is that the Posts tab tells you how each of your status updates performed after it was shared (if you have the Pro Plan), and that the Analysis and Insights tabs are reserved for the “Full Analytics” that come with a premium and business account.
Scheduling Your Posts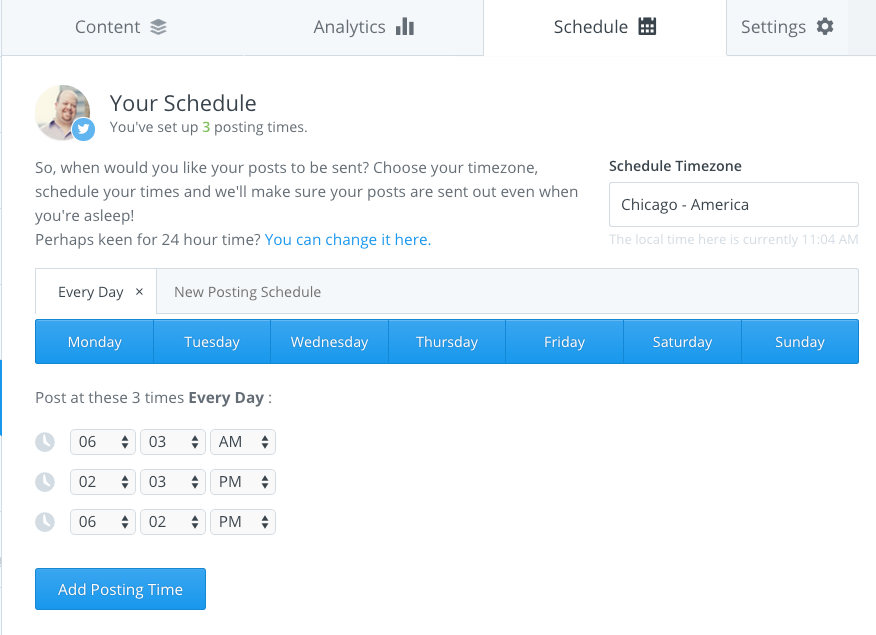
The Schedule tab is the most powerful feature of Buffer. It’s the most robust social media scheduling system available. Each profile has its own independent schedule, just like it has its own queue.
- First, make sure that your Timezone is correct for you. The default is London (UTC 0) and is also independent for each social profile, so you will need to change this setting for each schedule that you’re configuring.
- Next, consider when you want to share posts for this specific social profile. How often, which days of the week, and at what time, are all options that are going to be fairly unique to you and your business, and your audience (but we’ll take a detour from Buffer in a moment and dive into this question a little more to help you out).
For now, what’s important to understand is that you’re able to select or deselect specific days of the week just by clicking on them.
For the days that are selected, you can then add, edit or remove posting times below. If you want to create alternate times for different days of the week, click on New Posting Schedule.
It’s up to you how you configure them, and there can be overlap… just make sure you pay attention to the total number of posts going out on any given day, particularly for networks like Facebook, where it’s possible to post too much.
Buffer Settings
Within Settings, you have access to Link Shortening, Team Members, Reconnect, Shuffle Queue, and Google Analytics Campaign Tracking.
- Link Shortening: With Buffer, like most social media management tools, you can choose to use a “short link” when sharing content to social media, particularly Twitter.
- Team Members: You can add or remove Team Members here.
- Reconnect: If one of your social profiles has been disconnected from Buffer, use this to reconnect and re-authorize that profile.
- Shuffle Queue: Your first 200 queued updates will be shuffled into a completely random order.
- Google Analytics Campaign Tracking: With campaign tracking enabled in Buffer, you will be able to see how much traffic you receive from social media posts directly inside your Google Analytics dashboard.
How to Create Social Media Posts with Buffer
Now that you’ve connected all of your accounts, set up your schedule, and adjusted your settings as needed, it’s time to start creating content.
Just to be clear, each time you add a new status update and assign it to a social profile, that update will be automatically shared at the next available time slot. If you Buffer a post today for your Facebook Page, and your next available time slot for that post is tomorrow morning at 10am, that’s when that post will go out.
The basic share dialogue can be found within the Content tab, above your queue.
Clicking within that field will reveal all of your social profiles as a row of small icons across the top. You can select or deselect any social network just by clicking that icon. Which means it’s possible to create a status update that gets queued to all of your social profiles at once.
As you begin typing text for your update, note the counter in the lower left – that’s your character count.
You can insert a link to share at any time. As soon as you’ve entered it, Buffer will automatically shorten it for you using your Link Shortening settings.
And if you’ve selected a social network like Facebook that posts a preview of shared links, you’ll see a version of that preview below your status update field.
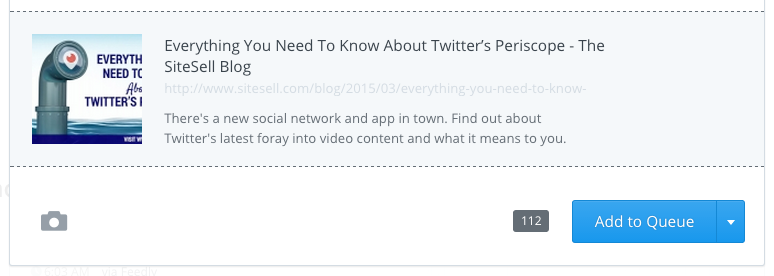
You can remove that preview, but you cannot change it. If you’re sharing a link to an article that has a poor image, or no image at all, it might be best to share an image instead of the link preview entirely.
To share an image with your status update, you can click on the camera icon in the lower left, or simply drag an image from your computer to that space. It will be uploaded to Buffer and then be previewed for you to verify.
- You cannot share an image and a link preview simultaneously, but you can share an image and include one or more links within your status update.
- Images shared via Buffer will be shared and appear as regular image posts for each network, which means the image will appear within the stream, including on Twitter.
- Images that are too large may not be permitted on certain networks, so be mindful of file size and dimensions.
Within the text of your update, you can say whatever you need to – whether it’s the title of an article you’re sharing, a question, or an introduction designed to spark a conversation. You can include hashtags and you can also @mention other users on Twitter.
Once you’ve finished composing your update, it’s time to hit the blue button in the bottom right corner… but there you have a couple of options.
You can add this update to your queue, share it now, or share it next. You can even pick a specific date and time to schedule a post, regardless of your queue or schedule for that social network.
When’s the Best Time To Post?
This question comes up all the time with business owners and solopreneurs. What’s the best time to post to social media?
The answer is, it depends. (Yeah, I know… not what you wanted to hear.)
The most important consideration to keep in mind is that your social network audience is unique to you, and may differ from one network to another. That means that no one can tell you the best time to post to your Facebook Page, for instance. At least, not without doing some research.
All you have to do is pick a preliminary schedule, create your content, and then monitor the results. After a few weeks (faster if you have a large online audience), adjust your schedule, keep posting status updates, and continue to monitor the results.
You can then use the Posts tab within Analytics to see which posts do well, and at what times, and make adjustments accordingly.
How to Monitor Social Media Engagement
To be fair, there’s one glaring omission from Buffer’s feature set that some solopreneurs might need, and that’s the capability to monitor and engage with your posts and audience. You can’t view notifications, retweets, mentions, shares or comments within Buffer.
But to be honest, the easiest method for brands and businesses to monitor their social profiles for social media engagement is to simply use the default mobile apps for each network!
If you put the Twitter, Facebook, and LinkedIn apps on your mobile phone, you can pick and choose which ones push notifications to you and demonstrate a badge icon for notifications. I can instantly see if I have 2 notifications on Facebook and can quickly tap the app and see what’s going on.
Additionally, Facebook has an app specifically for their business users.
The key is to find the right combination of tool(s) and process(es) that will enable you to quickly and easily see and respond to engagement from your social media fans.
How to Find Other Content to Share
If you’re blogging regularly or creating great evergreen pages of content, you should be routinely feeding those pieces of content into your Buffer.
But other than that, where can you curate great content to share?
Personally, I tend to use Feedly for RSS feeds on topics that I may blog about. With the Feedly Pro Plan, you’ll have the option to easily share articles to your queues within Buffer
Finally, use your past successful posts as inspiration for new content – and if you feel like you are lacking in successful posts, try our keyword brainstorming tool to uncover succesful ideas. While re-buffering past posts is an option, you should also pay attention to the topic and source and consider sharing more status updates like that one.
The Buffer Browser Extension
Another way to easily find and share great content is to install the Buffer social media extension for your browser. It will add a Buffer button to your toolbar, as well as add some integration into your viewing of websites.
Essentially, any time you’re on a blog or webpage that you want to share via Buffer, just click that Buffer button. It will open the same Buffer share dialogue box where you can now select one or more social networks, edit the text of the share, and even insert an image instead of the default link preview. And you can again choose to schedule the post, share it now, or share it next.
How to Use Buffer’s Analytics (Paid Plans Only)
While you won’t be able to monitor notifications or view details like individual retweets within Buffer, what you can do is easily see the total numbers for these metrics. We refer to these as “social signals.” Social signals include likes, favorites, +1’s, comments, replies, shares and mentions.
If you click on the Analytics tab and then Posts, for any particular social network, you’ll see all of the status updates that have been shared already, and the current metrics for each.
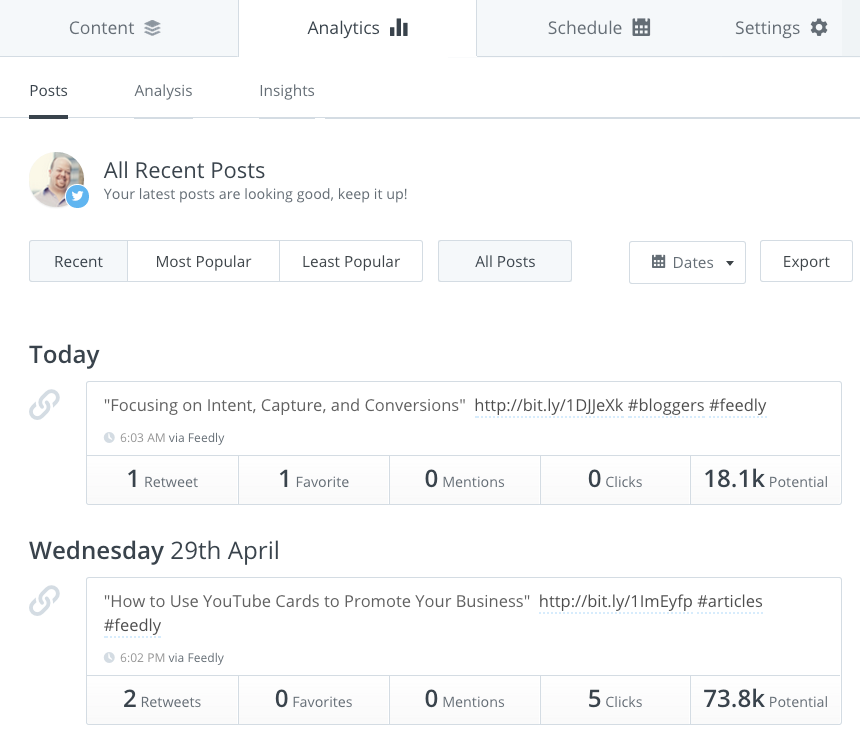
You can sort by Recent, Most Popular, Least Popular and by type of post (Image, Link, Text). You can also select a specific date range.
Below each post you can see what the activity on that post was, and for tweets you can even see what the potential reach was based on your follower count and the follower count of anyone who shared that tweet.
As you scroll through your past updates, Buffer even calls out the status updates that were the best for that period, so you can easily see which ones stood out to keep in mind for future updates.
And to be perfectly honest, for most of us, it’s more a matter of watching which status updates didn’t resonate with our audience and making a mental note to avoid that topic or style or message.
If you have the Buffer for Business or Premium plan, you also get to take advantage of the Analysis and Insights tabs.
Posting Analysis
The Analysis tab is fantastic for solopreneurs who want a little more automation and aggregation to their analytics. In other words, instead of sifting through your past posts one at a time, the Analysis tab shows you graphs and reports that summarize that data.
There’s a graph at the top that shows you how many posts per day were posted for that social profile (through Buffer), and how many clicks those posts got. It takes just seconds to see what your best (and worst) days of the month were.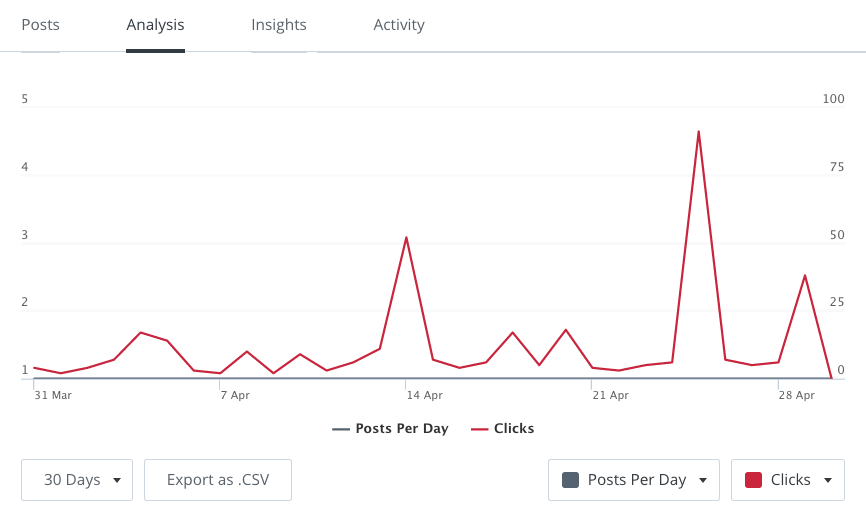
Below that, you’ll find a table display of all of your posts which you can easily sort by whatever social signals are supported by that profile. Want to find which tweets got the most retweets? The Analytics tab will tell you.
With this data available, you can get into far more granular detail about how your posts performed over the past month, and more easily determine which styles and content should be replicated in the future.
Insights
The Insights tab gives you a better perspective on how your activity is impacting your community. You can track your follower growth, see trends in activity levels, and see if there’s a correlation in publishing activity compared to follower count.
One of the really valuable aspects is the tracking of follower growth for all of your connected profiles in one place. No other tool provides that.
Reviewing these reports should be a part of your monthly routine, which we’ll outline in more detail below.
Social Media Scheduling: Daily / Weekly / Monthly
So, now that you have a thorough grounding in the mechanics of using Buffer, let’s get into some specifics in terms of how you can be using the tool on a regular basis. I’ve broken this out into Daily, Weekly and Monthly routines.
Daily
- Review your Suggestions and Feed content for great articles to share.
- Review how the previous day’s posts did and re-buffer any that really resonated.
Weekly
- Review how the previous week’s posts did and re-buffer any that really resonated.
- Review how effective lat week’s posts were according to time of day, compared to the previous week, and test other time slots.
Monthly
- Review all of the posts from the previous month. Note those that did well and those that did not, and try to replicate the style of those that were successful.
- Re-buffer posts of content that you want to continue to re-surface for new followers.
- Take a moment to review your RSS feeds and eliminate those that aren’t delivering great content, and routinely add new sources to keep everything fresh.
- Make sure your queues are filled up for the next month.
- Review your Analysis and Insights for each social profile to gauge your past performance and the effectiveness of campaigns, as well as the results of experiments.
Do keep in mind that all of Buffer’s analytics are only for posts that are shared through Buffer, so if you’re thinking about sharing something to a social network and were just going to share it directly, consider using the Buffer button in your browser and just choose Share Now. That will help make your monthly analytics more complete.
Buffer for Social Media: The Bottom Line
Buffer sports one of the best and easiest user interfaces, and features the most robust scheduling capability available.
With Buffer, solopreneurs can more easily set up a constant and valuable presence on whichever social networks they choose, including Facebook, LinkedIn, Twitter, Instagram and Pinterest. And most importantly for solopreneurs, that activity can be measured, tested and adjusted to eventually evolve into a valuable marketing and networking asset.
Don’t let the number of social networks and amount of activity that you’re “supposed” to generate scare or overwhelm you. Using a tool like Buffer, with a little bit of guidance from articles like this, can make a huge difference.
And if you’re like most of the rest of us, that’s not the only fear that’s getting in the way of your solopreneurship. We’ve studied some of the most famous spectacular failure stories, and discovered that there are several fears that get in the way of all entrepreneurs, and noted how those incredible individuals managed to overcome them.
It’s all part of our FREE email course on Solopreneurship, which you can join by clicking right here!
Latest posts by Mike Allton (see all)
- How to Avoid Failure in an Entrepreneurial Business - September 23, 2019
- How to Use Buffer for Social Media Management: The Solopreneur’s Guide - September 15, 2019
- Wix Review: An In-Depth Comparison of 10,000 Websites - September 1, 2019