
It’s a well-worn marketing phrase that you’ve probably heard around the world of blogging: “The money’s in the email list.”
And it’s true. Using email to contact potential customers can offer your online business a great return on investment — an investment that’s mostly your time.
Email marketing is inexpensive to start, can increase your sales and create raving fans for your business.
If it’s done properly.
In this article, we’ll walk through the steps you need to take to start an email list from scratch: what it means, why you need one, how to start and how to grow it.
And we’ll examine the most important question of all: is the money really in the list?
Step 1: Understand What an Email List Is
 The most common description of an email list goes something like: “a database of email subscribers who have opted to receive promotional messages from your company.”
You’ll hear people who sign up for a list referred to as a lead, a prospect, an avatar, a subscriber. Pretty impersonal.
And if you continue to think of it in those terms, you’re unlikely to have a list that helps your business.
Because the most critical point about an email list is this: every name on that list represents an individual. The list is a collection of human beings with problems, needs and desires, bound together by an interest in you, and your niche.
So your first step is this: understand the kind of people you hope will sign up for your list.
- Are they the same people you defined as your ideal site visitor?
- What problems do they have related to your niche?
- Why would they benefit from hearing from you?
Step 2: Understand Why an Email List Is So Important
 You’ll find lots of vague statements about this, like: “the energy of your business is directly tied to the strength of your email list.”
Which may be true — connecting with your readers is a key success factor in your online business.
but what does it mean in real terms? Here are some examples:
- It’s yours. It’s your main method of communicating with your audience. If other means of communication fail, if Facebook suddenly changes some policy, if WordPress crashes, your list is still there. You can carry on talking to your loyal audience.
- Communicating with your list can help define the top problems and pains for your site visitors, which in turn pinpoints the content and products on which you should focus.
- It can drive traffic to your website by highlighting new or updated articles.
- You can send highly specific messages depending on interests or needs, using advanced options like “segmentation.”
- Consistent quality communication can turn followers and subscribers into loyal fans who are more likely to share information.
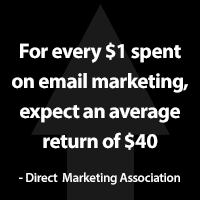
- The return on investment can be very high.
Step 3: Overcome List-Building Stumbling Blocks
 The four most common reasons for not starting to build an email list are quantity-related. But quantity isn’t the point. Quality is.
- I don’t have enough people visiting my website. Even having one or two is a start. Picture those two in a room with you. They’ve come because they’re interested in what you have to say.
Would you respond by saying “I can’t be bothered because there’s only two of you”? Nope. You’d give the best possible value to those who’d taken the trouble to turn up. And you’d have space to engage by giving individual, quality time.
A list of 1,000 people is irrelevant if only ten of them open your emails. Focus on the ten.
- I don’t have enough pages of content on my site. But do you have some? Start there, and grow it. Each time you publish a new article or update an old one, tell your email subscribers, no matter how few they are.
Every time you tell them, at least some will visit your site. They may even share it. So your traffic grows. The quantity of articles you have to share does not induce loyalty and trust. The quality of those articles does.
- I don’t have anything to sell. Selling should be a small part of your reasons for starting an email list. Of course, you’ll eventually be able to use your list to promote your products or make affiliate marketing sales.
But the primary aim at the start of your list-building journey is not to sell. It’s to create trust and loyalty. It’s all about the quality of the information you give — not how many dollars you can squeeze out of your subscribers.
- It’s too expensive. Cost is proportional to list size, so building your email list from scratch should not be expensive.
Throwing a lot of money at a costly platform at this stage isn’t necessary. Keep it simple. Go for ease of use rather than all-singing, all-dancing platforms. At this point, the quality of your basic communication is the point — not how many features your provider has.
So there we have it. Reasons to start your list and overcome potential deterrents.
But what about the practicalities? In the next steps, you’ll actually learn how to do it.
Step 4: Choose an Email Service
 You need an email service provider (ESP) – a company that will organize subscribers and allow you to create and send emails.
There are many providers available: choose the one you feel most comfortable with. The basic features you’re looking for are the ability to:
- create a signup form you place on your website to collect email addresses
- have at least some subscribers signed up to your email list for free
- use a “double opt-in” — more about this in Step 6
- send emails to all subscribers, and to sub-groups
- schedule automated emails
Solo Build It!’s “MailOut Manager” is included in the subscription and is the only platform to allow 5,000 emails per month at no extra cost. It’s a good choice for solopreneurs.
The free Mailchimp plan allows up to 1000 email sends per month but doesn’t include any automated sequences.
AWeber is a step up; companies like ConvertKit provide more advanced features when your list is growing.
Choose one email service and spend some time getting to know what the platform can and cannot do. Read their information; watch their instructional videos.
Whichever you use, the process for starting and growing your list is the same.
Step 5: Create an Opt-in Form
An opt-in form is the way people will sign up to your list. As you become more skilled with email lists you may want to make your forms more elaborate. Initially, though, keep it basic.
Let’s look at an example, using Mailchimp. Their signup boxes, like those from all the main providers, are easy to create, GDPR-compliant (more about this below) and mobile-friendly.
If you don’t already have a Mailchimp account, follow this link to their signup page and create one. Sign up for the free plan.
It’s a straightforward process, but if you need help see these instructions.
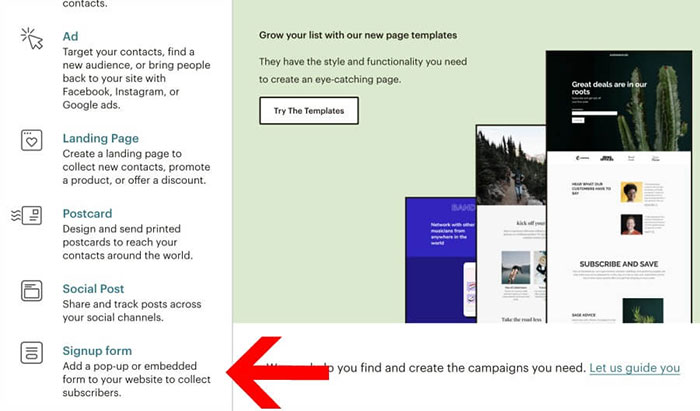
Once you’ve done that, click the “Create” button on the top navbar next to your name…

…and then on “Signup form” at the bottom of the left column:
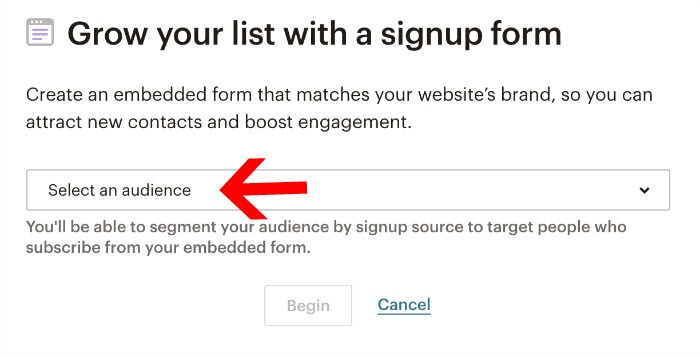
In the pop-up form you’ll now see, your “audience” will be the business name you entered when signing up.
Now you have “form options.” Keep it simple at this point by choosing “Classic.” You can play with more detailed forms later. For now, our aim is to get it done.
As you change options in the left column, the preview to the right will change. So, from the menu in the left column, choose:
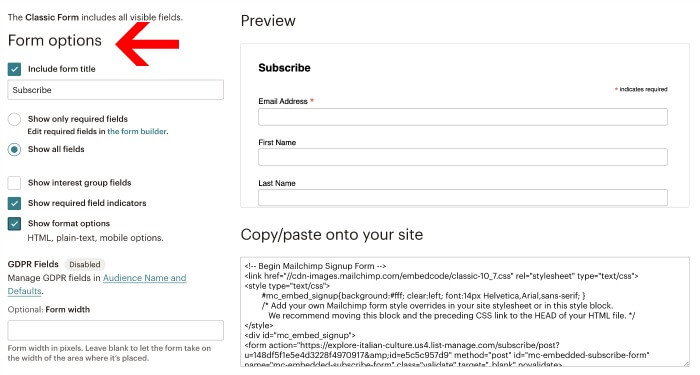
Form Title: Name your form. You may eventually have more than one list. Calling it something as simple as “Newsletter” is fine.
Required Fields: People these days are often worried about giving away their personal information. So request as little as possible. Think about every “field” and ask yourself why you need it.
Email address, of course, is a given, and to personalize mails, the first name is too. The surname may or may not be necessary: if you have a counseling business, for example, you may need surnames for appointment purposes, but if you’re creating a newsletter for a blog, you won’t.
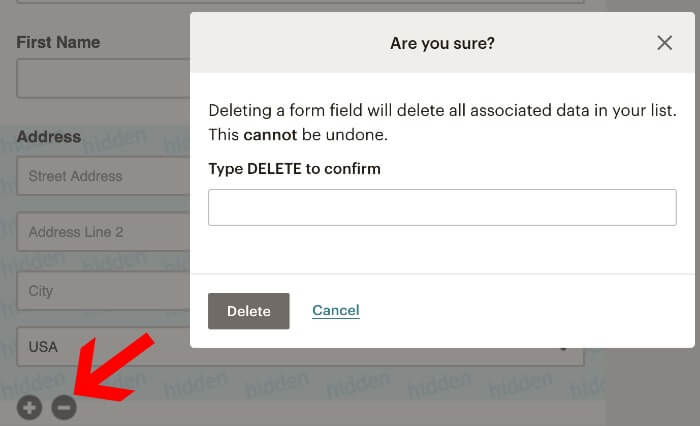
In order to change any of the fields, click “Edit required fields in the form builder.” Now click in any of the fields you want to delete, then on the “–” button and type “DELETE” into the “Are you sure?” box.
To make these “fields” required, so that the form cannot be submitted without the information, click “required field” in the form builder.
GDPR Fields: If you’re not sure what this means, our article about what GDPR means for solopreneurs will help.
Click “Audience name and defaults” in the left menu and check the “Enable double opt-in” and “enable GDPR fields.” That ensures you’re compliant with GDPR regulations.
Underneath that, you’ll find your default name and the email address to which people will reply. Check they’re correct and click on the “Save audience and campaign defaults” button.
Now copy the code provided, and paste it into your website. You can include opt-in forms on any page in your site.
Which brings us to the question of where to place email signup forms to get the most subscribers.
Step 6: Where to Put the Signup Form
 Landing page: There’s no point putting an opt-in form on your sidebar and hoping for the best. Your audience needs to know what they’re signing up for — why they should trust you enough to hand over their email address.
People don’t just want to sign up for your email list. They want to get special offers or insider information, and learn from your expertise.
So your first job should be to create what’s called, in marketing terms, a “landing page.” That’s simply a page where you tell your readers what to expect.
Check out our dedicated article on how to create a landing page before you start writing and designing your page.
The landing page should contain:
- clear information: what to expect, and how often
- compelling reasons to join: talk about any special offers, your expertise, and special information they won’t find on your blog
- what you won’t do: send spammy messages or share email addresses with other companies
- your signup form: where they can submit their information and join the list.
This landing page covers the basics right from the start — see the whole page here.
Here are five other places you should consider putting your signup form:
- About page: where people can learn more about you and what you can offer them.
- Bottom of a blog post: Use analytics to find your most popular pages. If your content is great, people will be receptive to your offer. Try a compelling call to action: “If you enjoyed this article, sign up for more great content!
- In a “start here” page, if you have one. People new to your niche will be looking for help.
- In your sidebar: This tends to be a less successful placement, because there’s no information there about what subscribers can expect. Add a link to your landing page for those who want to know more.
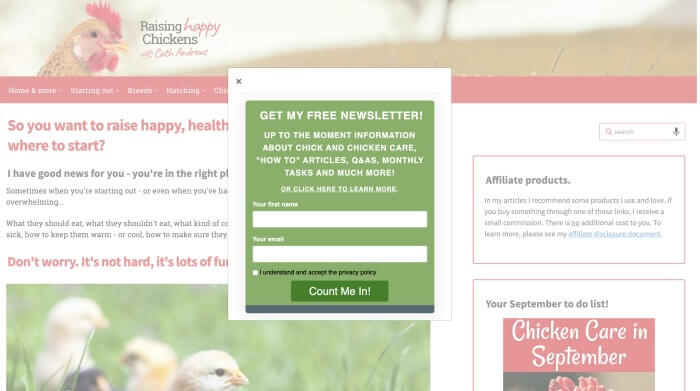
- In an “exit pop-up.” You’ll have seen these yourself: you’re about to leave a page when an invitation to subscribe appears on your screen.
These are known to have a great signup rate, but they can annoy, and they can also contravene Google’s requirements. Some providers — Solo Build It! among them — enable you to create appropriate forms.
This form was created in AWeber, using Solo Build It’s (free) “Exit Intent” modal to make it pop up when the mouse moves to the top of the page.
Step 7: Create a Freebie to Encourage Signups
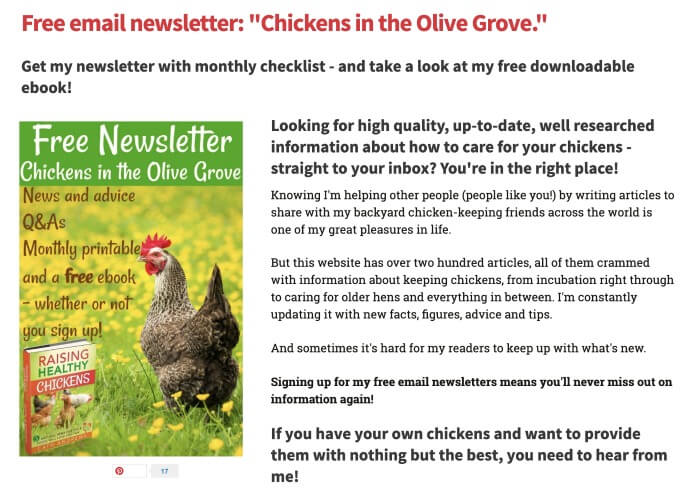
Everyone loves a freebie, right? And potential subscribers are no exception. So why not create something of value to your readers, which they’ll receive in return for giving up their email address.
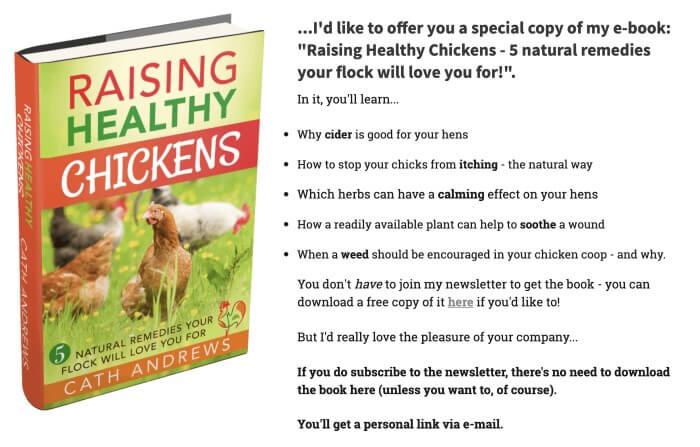
Known as a “lead magnet,” this is the most common way of encouraging signups. Think about a problem or wish your audience has. In this example, it’s “I want to find a way to improve my chickens’ health without resorting to chemicals.”
To get ideas of topics in your niche that could become a lead magnet, use a keyword brainstorming tool.
So, think about a potential solution and turn it into a giveaway.
Ebooks, created as a downloadable PDF document, are the most common, but it might be:
- Checklist: Think of a process your readers have to go through and make it into a list. Travel blog? How about a list of essentials to pack for a trip to Europe? Child-focused blog? Why not a back-to-school checklist?
- List of resources: Technology niche? List your favorite WordPress plugins. Homesteading blog? List the ten most useful “starting out” books. Explain why you’ve chosen each one.
- Email course: “Course” has a high perceived value, but this might be as simple as a recipe site sending an email a day for seven days with a recipe and tips for creating a healthy dinner. Create the course once, automate it and update it every six months.
- A report: Like an ebook, but shorter! Research information about a subject you know your audience is concerned about. For a cooking site, this could be about the different labeling of eggs. What’s the difference between caged, free range and pastured?
- A product: take a product you sell, or intend to sell, and give away a piece of it. Quilting site? Give away a free pattern. If you’re an author, you could give away the first chapter of your most recent book.
On your landing page, add a picture of your giveaway. Add text that pulls out its key features. What benefits will your subscribers get from this lead magnet?
If your lead magnet is good enough, subscribers will know they want to open your emails. After all, you give great value.
So now you have:
- created a signup form
- written a landing page
- decided on and made a giveaway (lead magnet)
- added your giveaway to the landing page.
Now it just remains to add the code for your signup box to the page, and test the process yourself by signing up.
How your subscribers will get your giveaway will depend on your email provider. In most cases it will be on a “thank you” page, which they receive immediately after signing up.
Once you’ve finished the process, test it by signing yourself up.
Does the process work smoothly? Would you be convinced to sign up, and pleased by what happens next?
If not, revisit these steps.
Step 8: Grow Your Email List with a Marketing Strategy
 It can be dispiriting to have worked hard on creating your signup only to realize that no one is signing up. Of course, you can start by asking your family and friends, but they’re not likely to be engaged — unless they have an interest in your topic.
But there are effective marketing strategies — ways of advertising your signup — that you should implement right from the start. Begin with these and add more advanced methods later. We will look at best practices in email marketing at a later date.
Content Marketing
The first and most effective way to encourage readers to sign up to your list is by ensuring you have great content on your blog. Know your subject. Know what your site visitors are searching for. Offer content that meets their needs and solves their problems.
They’ll sign up for more.
Is it possible to build an email list without a website?
Not unless you’re a celebrity, or at least a well-known niche influencer. Trust is a massively important part of list-building. Your audience needs to know you have information worth reading and that you have the credentials to know what you’re talking about.
You need a content-rich blog that’s found by the search engines. A one-page “website” just doesn’t cut it.
Social Media Marketing
If you are promoting your business on social media, post a link to your landing page. Let’s start with the most potentially effective social platform first.
Pinterest: Reach (the number of people you can reach per post/pin) here is far better than on Facebook, and pinners are there to “do, try or buy,” so this is one of the best platforms for “marketing” your signup.
Pins about your giveaway do best here, with a link to your landing page.
Facebook business page: the number of people who see a post on your Facebook business page is now very limited. Increase it by sharing a picture of your freebie and asking people a question like “How do you like my free ebook cover?” — and always provide a link.
Facebook groups: if you have your own group, it’s the obvious place to link from. Be careful about linking from someone else’s group. Unless the moderator agreed to it beforehand, a link to your site is likely to see you at least warned, at worst banned from the group.
Facebook Ads: pay to promote your business page post, or create a specific ad for your signup. Advertise the free giveaway rather than the signup itself.
Twitter: using the right hashtags will potentially reach a broad range of people. It’s not as effective as Facebook, unless you already have an active following.
Buy an Email List: Good Idea or Not?
Not.
Never be tempted to buy email marketing lists. Not even when your own list is just two people.
Why?
- You’re violating the rules of consent in the GDPR legislation. You must have explicit consent from every subscriber.
- People on a bought list know nothing about you. They may have signed up for something totally unrelated. So they’re likely either to unsubscribe or to report you. Or both.
- You’ll harm your reputation. And, as we’ve seen, trust is important in email marketing.
- If you have a reputable email provider, they can (and will) penalize you. AWeber, for example, will close your account.
Keep it real. Use the best marketing strategies we’ve highlighted above to build your email list from scratch. You’ll get far better results than using a deceptive approach.
Conclusion: Is the Money in the List?
No. It’s in how you build your list. If you do it right, it’s easy to monetize your email list. You need to earn the right to your subscribers’ email addresses. We’ve looked at how to do this by:
- making your signup form simple
- being clear about what subscribers can expect when they sign up
- providing a unique incentive by offering a free giveaway, or lead magnet, which has value to your audience
- having a compelling landing page placed on your content-rich blog
- marketing your email list, using your content-rich website to attract loyal followers
- using social media platforms to grow your list still further
Building a list is just the beginning. What you do with it is the critical issue.
Next Steps
You have all the information you need to start your email list from scratch, and to begin growing it through content and social media.
Now all you have to do is — do it.
When you’ve had a little time to put these strategies into action, we’ll meet again — and discuss how you can grow your business with email marketing tips and best practices.

Cath Andrews
Latest posts by Cath Andrews (see all)
- Start a Passion-Based Business and Live Your Dream - February 1, 2023
- What Do You Say When Their Eyes Glaze Over? - December 20, 2021
- How to Monetize Your Email List in 5 Simple Steps - October 26, 2021
